
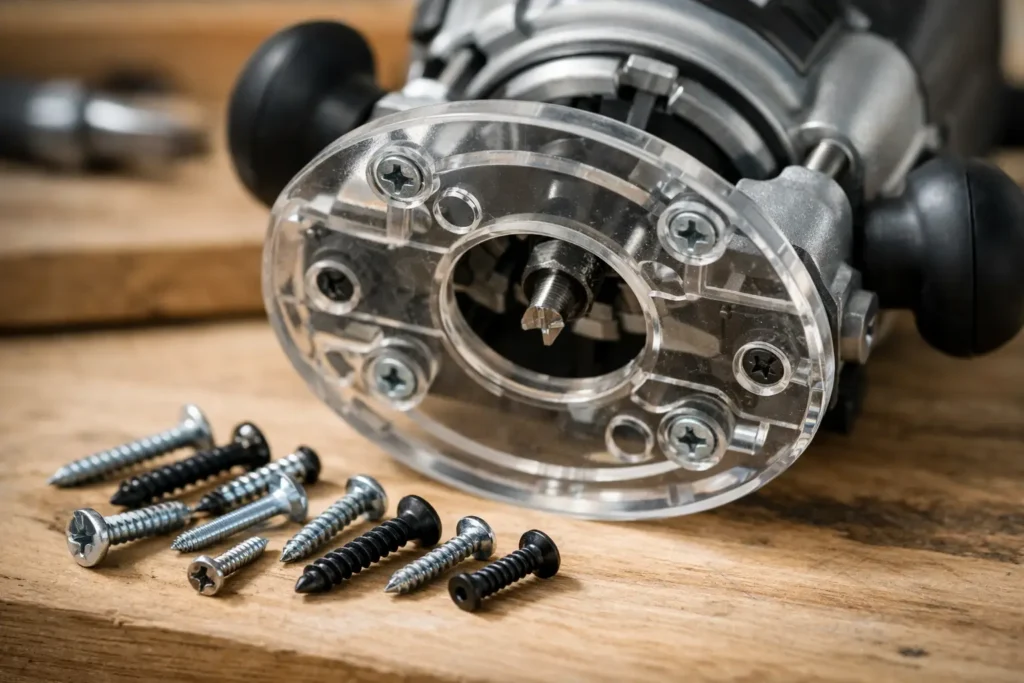
A baseplate can sit perfectly flat on the bench and still be the wrong installation if the mounting screws are not right. If you are asking what screws fit router baseplate mounting holes, the short answer is: the screws must match your specific router’s threaded holes, the plate thickness, and the countersink shape. There is no single universal router-baseplate screw.
A screw that is slightly too large can damage the router’s threaded mounting holes. One that is too long can bottom out before the plate is secure. One with the wrong head profile can sit proud of the baseplate and catch on a template or workpiece. Get the fit right before the router goes back on the bench.
What Screws Fit a Router Baseplate?
Most router baseplates attach with flat-head machine screws. They are machine screws because they thread into the router’s metal base or mounting points, not into wood. Their countersunk heads sit flush with the face of the plate so the router can glide smoothly across a jig, template, or workpiece.
The exact diameter and thread vary by router brand and, often, by router model. Common possibilities include metric threads such as M4, M5, or M6, as well as imperial sizes such as #8-32, #10-24, #10-32, or 1/4-20. Those examples are starting points, not a substitute for checking your router. A router from the same manufacturer may use different hardware from one generation or size class to the next.
The screw head matters as much as the thread. Most clear acrylic, polycarbonate, aluminum, and phenolic baseplates are drilled and countersunk for a flat-head screw. A pan-head, button-head, or socket-cap screw may fit the thread but will usually stand above the plate surface. That is not acceptable for precision routing.
Start With the Router, Not the Plate
Remove the original baseplate screws and use them as your reference whenever possible. If the factory plate is still installed, this is the fastest and safest way to identify what you need. Keep the screws organized as you remove them. Router bases may use more than one screw length, especially where a sub-base, guide-bushing adapter, or accessory mount is involved.
Check four details: thread diameter, thread pitch, length under the head, and head style. A hardware store thread gauge can identify metric pitch or imperial threads-per-inch. A caliper makes diameter and length checks more reliable. Measure a flat-head screw from the top of the head to the tip because the head sits inside the countersink. Do not measure only the exposed shank.
If you do not have a gauge, compare the original screw directly with a known machine screw from a thread assortment. The replacement should start into the router hole by hand and turn smoothly for several full turns. Any resistance at the first thread is a stop sign. Do not force it with a screwdriver, drill, or driver.
A stripped mounting hole is harder to correct than a delayed project.
Why router brand alone is not enough
Router brand is the best first filter when selecting a purpose-built baseplate, but it does not always identify the screw set by itself. Manufacturers change bases, introduce fixed and plunge versions, and use different hardware across trim routers, midsize routers, and full-size routers.
That is why the router model number is useful. Find it on the motor housing, base casting, or product label. Then verify the baseplate mounting pattern and screw specification for that model. If you are replacing a missing factory plate, do not assume a screw size based only on a photo or a similarly named router.
Choose the Right Screw Length
Baseplate thickness changes the required screw length. A replacement plate may be thicker or thinner than the factory plastic sub-base, so the original screws are not automatically the correct choice.
The goal is enough thread engagement in the router base without the screw reaching the bottom of a blind hole. As a practical rule, you want several full threads engaged, with the plate pulled tight and the screw head fully seated in its countersink. The screw should not tighten suddenly before the plate is snug. That can indicate bottoming out.
If a new plate is thicker than the original, an original screw may not reach far enough into the router base. If the new plate is thinner, the same screw may extend too deeply. Compare the plate thicknesses and test-fit each screw by hand before final assembly.
Avoid solving a too-long screw with a stack of loose washers under a countersunk head. Washers prevent the head from seating in the countersink and can leave hardware above the base surface. A correctly sized flat-head machine screw is the clean solution. If the plate design calls for a spacer or washer, use the hardware specified for that plate and keep it on the router side of the plate where applicable.
Match the Countersink Angle and Head Diameter
Flat-head screws are not all shaped alike. Imperial flat-head screws commonly use an 82-degree countersink angle, while many metric flat-head screws use a 90-degree angle. A screw can have the correct thread and length but still seat poorly if its head angle does not match the countersink in the baseplate.
Look for a head that sits flush without rocking, leaving a gap, or needing excessive torque. The head diameter must also fit the countersunk recess. An oversized head may overlap the recess. An undersized head can sink too far and may not clamp the plate evenly.
Clear baseplates make this especially easy to inspect. Look through the material from the router-bit side. A correctly seated screw head should be flush and even with the surrounding plate. If it projects even slightly, it can scratch a template, hang at an edge, or throw off a pattern-routing setup.
Separate Baseplate Screws From Guide-Bushing Screws
A frequent source of confusion is mixing up screws that mount the baseplate to the router with screws that mount a guide bushing, centering cone, or insert ring. These are separate attachment points and can use different threads and lengths.
The baseplate mounting screws secure the entire plate to the router. Guide-bushing hardware attaches an accessory to the center opening of the plate. Do not use a guide-bushing screw as a substitute for a baseplate screw just because it appears to fit. Its length, head style, and load position may be wrong.
Likewise, a plate designed for a removable insert may use dedicated screws only for that insert. Follow the plate’s mounting layout. Every fastener should sit below or flush with the working face of the baseplate.
Install a Router Baseplate Without Damaging the Threads
Start by unplugging the router and removing the bit. Set the router upside down on a protected bench surface so the motor housing and switches are supported. Clean sawdust, old threadlocker, and debris from the threaded holes. Compressed air can help, but keep debris away from the motor openings.
Position the baseplate and begin all screws by hand before tightening any one screw fully. This keeps the plate aligned and prevents a screw from starting at an angle. Once every screw has engaged, tighten them gradually in an alternating pattern. Use a hand screwdriver or a carefully controlled driver. These screws do not need extreme torque.
Check the baseplate after tightening. It should sit flat with no gap between the plate and router base. Spin the router bit by hand to confirm it clears the center opening. Then slide a straightedge or your fingertip across each screw location to confirm that every head is flush.
Threadlocker is not always necessary. If your router’s original screws had threadlocker residue, use a small amount of removable, medium-strength threadlocker rather than a permanent type. Do not apply enough to fill the hole or create hydraulic pressure at the bottom of a blind mounting hole.
When Standard Hardware Does Not Fit
Stop and verify the setup if the original screws are missing, the router has a modified base, the mounting holes are damaged, or the new plate does not align cleanly. Do not enlarge plate holes or force a different thread into the router just to make available hardware work.
For a nonstandard router configuration, provide the router brand, model number, mounting-hole spacing, original baseplate thickness if known, and clear photos of the router base. This gives a custom-order supplier enough information to identify a compatible plate and appropriate mounting hardware. Hobby Woodcraft can help with custom baseplate requirements when a standard router-brand option is not the right fit.
The right screw is a small part of the setup, but it protects the accuracy of everything that follows. Confirm the thread, length, and flush head fit before routing your first pass, and your baseplate will stay where it belongs: flat, secure, and out of the way.